Friday, 11 March 2016

Feeling a Bit Gassy.

As I've already posted, the kitchenette has been in for some time.
This week, the gas went on!

We had originally planned for a 9kg bottle but decided on a smaller bottle so we had more room and less hassle.

The hardest part was finding an accredited caravan/motor home fitter so he could give us our ticket which is required for the engineer certificate.

We found a guy who was willing to do the job and make the drive down. Fist visit he told us what we needed to do to be certified and cover safety regulations.
This mostly involved a sealed box, accessible from the outside only, able to withstand a lot of force, bolted to the bus body with M8 bolts etc, lockable door, rear facing, bottom vents.
These had to be a certain circumference and we had to add PVC pipes cut at an angle to stop a vacuume effect when traveling.
The bottle had to be secured in a purpose made cradle which could also withstand force. We were lucky that the bus is diesel as there is a whole other list of drama with fuel and ignition points!

PHEW! Got that bit done and then had to wait a few months for the 2nd visit to arrive.

Well... yesterday was the day. we now have a functioning stove!
Here is the Dinette. The cupboard on the left has the gas box in it.


It got painted white and is all nice now.

 See the vent holes with PVC pipes fitted? 
The bottle bracket is a standard one off eBay.

Not sure if I posted about the door. It is a fibreglass one from Caravans Plus (see previous posts for link).


These signs are from eBay and the bottom one is from our local caravan shop. These are 'must haves' to get the ticket.
Our permanent vent is the window which must be opened when the cooker is in use. 
 Here is the first bit. A tap in the line and pipe to the stove.
All done! A regulator on and the cooker is ready to go. 
(the bottle will be latched in when on the go, of course!)

Wednesday, 20 January 2016

Dinette

I don't think I have had a chance to write about our little dinette.
The original plan was to put it on the other side of the bus but the gas storage wouldn't allow for it so we moved it over to the door side.

It is a pretty simple little thing.

First we insulated and lined the wall like we have in the rest of the bus, taking note of spots we could bolt the frame of the dinette to. We have used the same 3mm steel angles and M8 bolts as in the rest of the bus too.

The dinette frame was constructed using 4" x 2" structural pine.
We made the box shape and bolted it together.


Next, we stuck and screwed the leftover bathroom WallArt lining on the outside. Durable, shiny, white and didn't cost us extra... win!


We added a white fire extinguisher mounting recess and screwed it in place by the door. This was purchased at a local caravan accessory place. The requirement is to have it near to the exit/entry and fire points. We will also have a larger one in the cabin area in case of engine/kitchen fires.


The lid of the dinette seat is laminated pine panel from Bunnings, routed with a bullnose and painted white. We used big 150mm hinges because it will be lifted often and sat on.


The clips ensure that the lid doesn't come open in travel, especially since it will store heavy objects such as a camp oven and the battery compartment.


Next is the table mount. We opted for the Lagun table arm as it is easily detached and has a number of options in moving/height adjustment. We purchased this from a yacht and boating store online. Expensive but worth it for the flexibility, quality and look of it.


The cushions for the seat are made from 3mm (back) and 4mm (seat) high density foam purchased cut to size from Aussie Disposals. This is durable and will not squash quickly. We made the covers using upholstery material from Spotlight ($9m on special!) and overlocking/sewing them.


The little tabletop is made from the same laminated pine as the seat but we opted to varnish it to match the kitchenette benchtop.

We cut the table in half and routed it in such a way that it can be folded in half and still be functional as a small table. This saves space as it can be used by a single person or pushed out of the way more easily than a big table.

We reattached the halves using decorative hinges (Bunnings) and a rubber stopper, screwed to the Lagun arm, stops the table hyper-extending and breaking when in the open position. Tiny silicone stoppers means there will be no rattles and the table is level when closed. And that is that...


Saturday, 26 December 2015

A little curtain.

We purchased a curtain rail off eBay a little while ago. This was to go between the cabin and the living space to shut it off a bit.

It is a 'special' little rail. Super slimline and comes with all the fittings.
The best parts are the fact that it can be ordered by the metre, cut to the perfect size when it arrives...
AND...

It can be bent to the shape of the roof!
Yay!

It will arrive by courier, taped to a long bit of wood so it doesn't get damaged.

Anyway, we got ours and set about cutting it and bending it to shape. We had kept some of the stainless roof joiners from when we demolished the inside of the bus. My husband easily bent it to the right shape.

Next we drilled and screwed it into the bus frame and popped on all of the sliding fittings. Easy.

Yesterday we had to drop a Christmas visitor off at the train station so we took advantage of the visit to town and hit the Boxing Day sales!

We managed to pick up the perfect curtain in Spotlight for a good price.

Today I re-hemmed the bottom, making it the right size and I hung it on the rail.


Bit tricky to get the hem perfect because there is a hump in the middle of the bus where the engine is.

It all tucks away behind the pantry cupboard. I'll probably secure it with a Velcro strap.

Friday, 11 December 2015

The roof, the roof, the roof is on... well, it is in anyway.

Note to other motor home/bus converting people:
If you find something you like for your bus, make sure you buy as much as you're going to need, all at the one time!

We had enough of the white, shiny plastic coated ply for the roof interior (purchased at Mitre10 a long time ago) but only bought a couple of the 3mm plastic joining strips that we needed. It turned out that we needed LOTS more than we first expected. The trouble is, they didn't get it back in... and they couldn't order more! They pulled a gungy bit of the strip from the skip bin and gave it to us, but it still wasn't enough (I cleaned it up using toothpaste... it came up alright too!)

ANYWAY...
Today I found some.
It was in our old caravan which my husband uses as a bit of a workshop.

SO...
we put the ceiling in!


Remember this eBay purchase from AGES ago? I think it was about $83 (I think I might ave been the only bidder) and it came with a white interior surround which had a little roll out sun screen and a roll out fly screen. 


Here I've rolled 1/2 of each out so you can see.

It pops open like this.

My husband cut the hole out while I was at work. We sealed it with bitumen coated foam and black Sika seal. It stayed that way for MONTHS so we know it is well and truly watertight. A metal frame was welded up and went around this part to reinforce the roof. I stupidly forgot to take a photo. I hope the engineer can peek through the hole and see it.


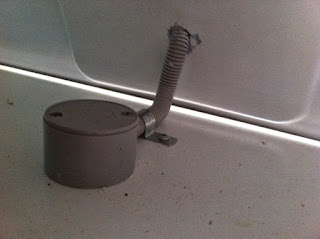
Here is the ceiling partly lined. We used the same insulation as in the walls. It works really well and is also a sound deadener. Pouring rain on the roof sounds amazing. The electrical cables are running in the roof in some spots, as are the cables for the speakers up the back. They are all in conduit so as not to rub on the steel frame while driving along (see on the left of the photo. This grey stuff is from Bunnings and the speaker conduit from Supercheap).


After the ceiling was all up, we then added some plastic surround to neaten up the edges (it is mostly covered by the white sunroof surround now).

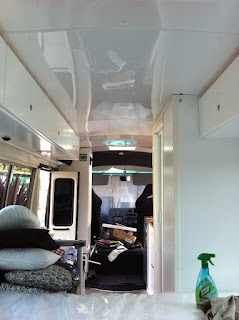
The whole ceiling in its shiny, white glory!
Shame about the building gear and cleaning stuff laying around!


Closed sun shade.


Closed fly screen.


 Opened hatch!
(Excuse the grubby fingerprints. I was too excited and took pictures before cleaning).


From the outside.

Sunday, 10 May 2015

Its alive, ITS ALIVE! Power is ON.

Today is a good day.

We finally got the power connected.

We bought all of this stuff about a year and a half ago. It was from our local Jayco dealer and since then we have added lots of electrical goodies to our 'stash'. USB ports, ciga ports, etc, etc.

We've gradually been doing wiring and putting lights on as we go. We even installed the solar panels but they weren't connected to anything.


Remember this from WAAAAAY back? 
We managed to hide the cables as we went. The 25mm conduit and saddles are from Bunnings. Most of our electrical gear came from this guy who lives in our next biggest town but he has an eBay store http://stores.ebay.com.au/autoelecau?_trksid=p2047675.l2563 We bought metres and metres of 6mm wire from him. Good quality and nice and thick.

But lets start from the top. We bought all of the gear from ARB and opted for good quality RedARC stuff. http://www.redarc.com.au/

Our FIRST Shopping list looked like this:
-2x 150W mono panels.
-Alternator charger thingo and a relay switch so the solar shuts off and the alternator does the charging when in motion.
-Solar regulator and thermometer to shut down if it gets too hot.
-Solar display and data cable.
-A fuse.

It cost a small fortune.

We have since added:
-One more solar panel.
-2x 75AH Optima batteries 'Yellow Top' (smaller AH means faster charging and the AH works out to be okay for us... we hope) https://www.optima-batteries.com.au/
-A Narva 8 switch and fuse panel.
-A circuit breaker.
-5 and 10 port bus bars (for actives and neutrals)
-Heaps of various wiring, shrink wrap etc.
-Battery mounting brackets.

More money gone.

Anyway, my husband is an ex-electrician so I was pretty confident that all would be well.

The panels went on with rivnuts, rubber, Sikaflex and rivnuts AGES ago. Wiring joins are tucked away neatly in junction boxes and wire is in conduit which is saddled to the roof. Pretty sure I blogged about it back then.

x3

Next... well, lets let the photos do the talking.


Inside wiring is mostly inside the top cupboards and 'capped' with these things. It basically means we can work on stuff without ripping walls off. This stuff is from Bunnings.


Batteries have to be vented to the outside because they can produce hydrogen gas when charging. A few 5mm holes in the floor are fine according to the engineer. These batteries are good quality and are almost guaranteed not to do it. Best to be safe though! They also need to be locked down with a strong bracket (see the one on the right) and sealed so they won't leak to the inside of the caravan.

Don't ask me about wiring, I don't know. I would suggest getting wired in by an auto-elec if you don't know about this stuff. 


Regulator on the right, alternator charger on the left (not wired in yet). There is a big fuse wired in somewhere and a temp monitor too. These are protective devices to save the equipment in extreme conditions or if there is a surge. 
I may get a 240 charger at some stage and add a port to the outside... depending on if we find we need to or not. Also, I may get an inverter. At this stage, we are not planning to have one though.


Here is the remote solar monitor. You can also see the cords above the door, There ended up being more than this lot though!


Hidden by a padded head bumper thingo I made. The light under it runs on the bus' internal lighting system.

      
Spaghetti. This all comes into a pantry type cupboard behind my passenger seat. That circular thing on the right is a speaker. The square on the left is the monitor. The door has the switchboard set into it. 


Wiring in progress. You can see the bus bars and circuit breaker on the right hand side of the cabinet. The switch board also has a fuse for each switch. Don't forget to write everything down as you wire stuff in. I've made a wiring chart to save the frustration in later years if we need to work on the wiring again. I've laminated it and will stick it in the back of the cupboard.


As you can see, there is still space for other stuff to be added later. We are considering an outdoor ciga port for an additional fridge/freezer.


Somehow the spaghetti has been tamed!


Switches with the cover off, you can see the fuses. 

Time to test it out!


The fridge is working. Awesome. 


The outdoor light works!


And this one!


Bathroom is all good!


Lots of light for the kitchenette.


Bead head lights are good too!


Lets just switch them all on.


Glow in the dark. I'm pretty happy with that!